Making the Scheitholt
(A Medieval Musical Instrument)
Ellen Kuhfeld
Music is a pleasant thing, and playing an instrument can easily increase the pleasure; but the discipline of learning the more common instruments can be forbidding. Fortunately, the instruments of the mountain zither family – descendants of the instructional monochord - have the very scales and harmonies built into their form. The player need only learn to put the notes in sequence.
The earliest zithers are closest in construction and concept to the ancestral monochord. Michael Praetorius' Syntagma Musicum (1618) has an illustration of the German scheitholt, an early mountain zither. In Praetorius' day, such instruments were known over most of Europe. Panum states that there is no doubt of its medieval origin. The modern American version is the Appalachian dulcimer.
As a folk instrument, the scheitholt is easy to make and to play: a wooden box with a soundhole and strings, and provisions for tuning and fretting those strings.
The scheitholt in its many incarnations has had an enormous range of shapes, sizes, and tunings. What follows is appropriate for a scheitholt, and is taken from one I constructed. (The dimensions are scaled from Praetorius' illustration as given in Bessaraboff's appendix; and are appropriate for readily-available dimensions of wood.) If you happen to have wood of different dimensions, or want an instrument of another size, things scale up and down quite well. Here are lists of the materials and tools you will need.
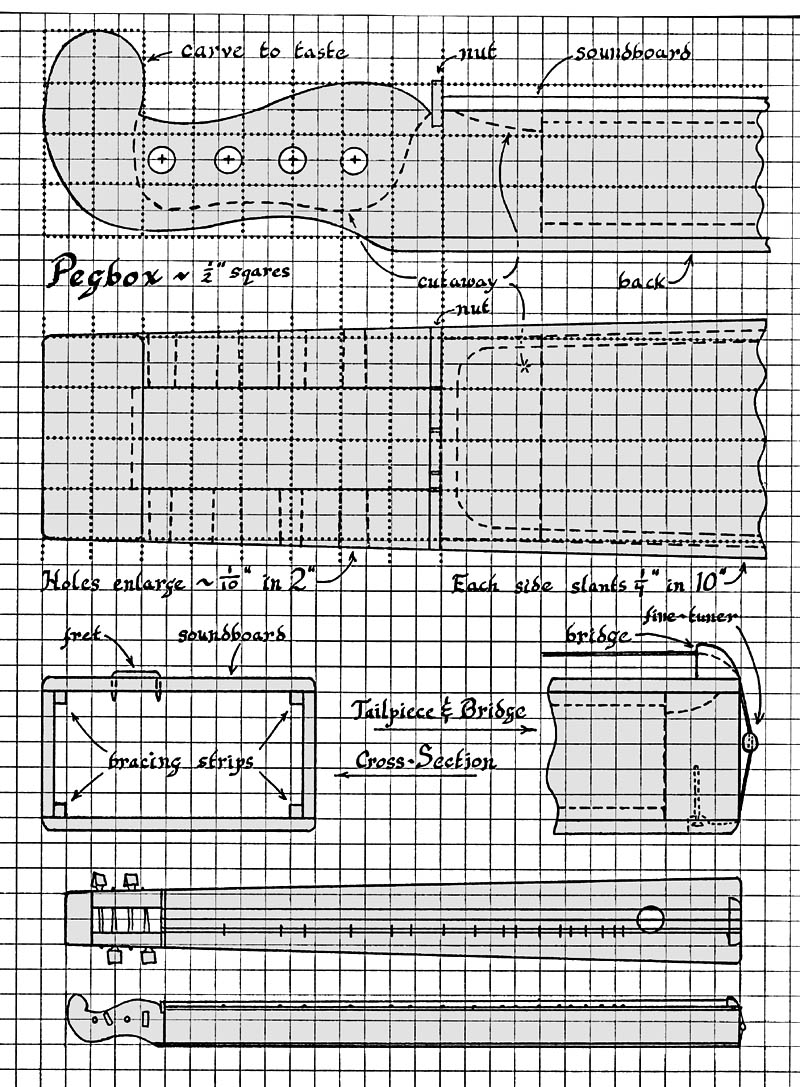
Pegbox
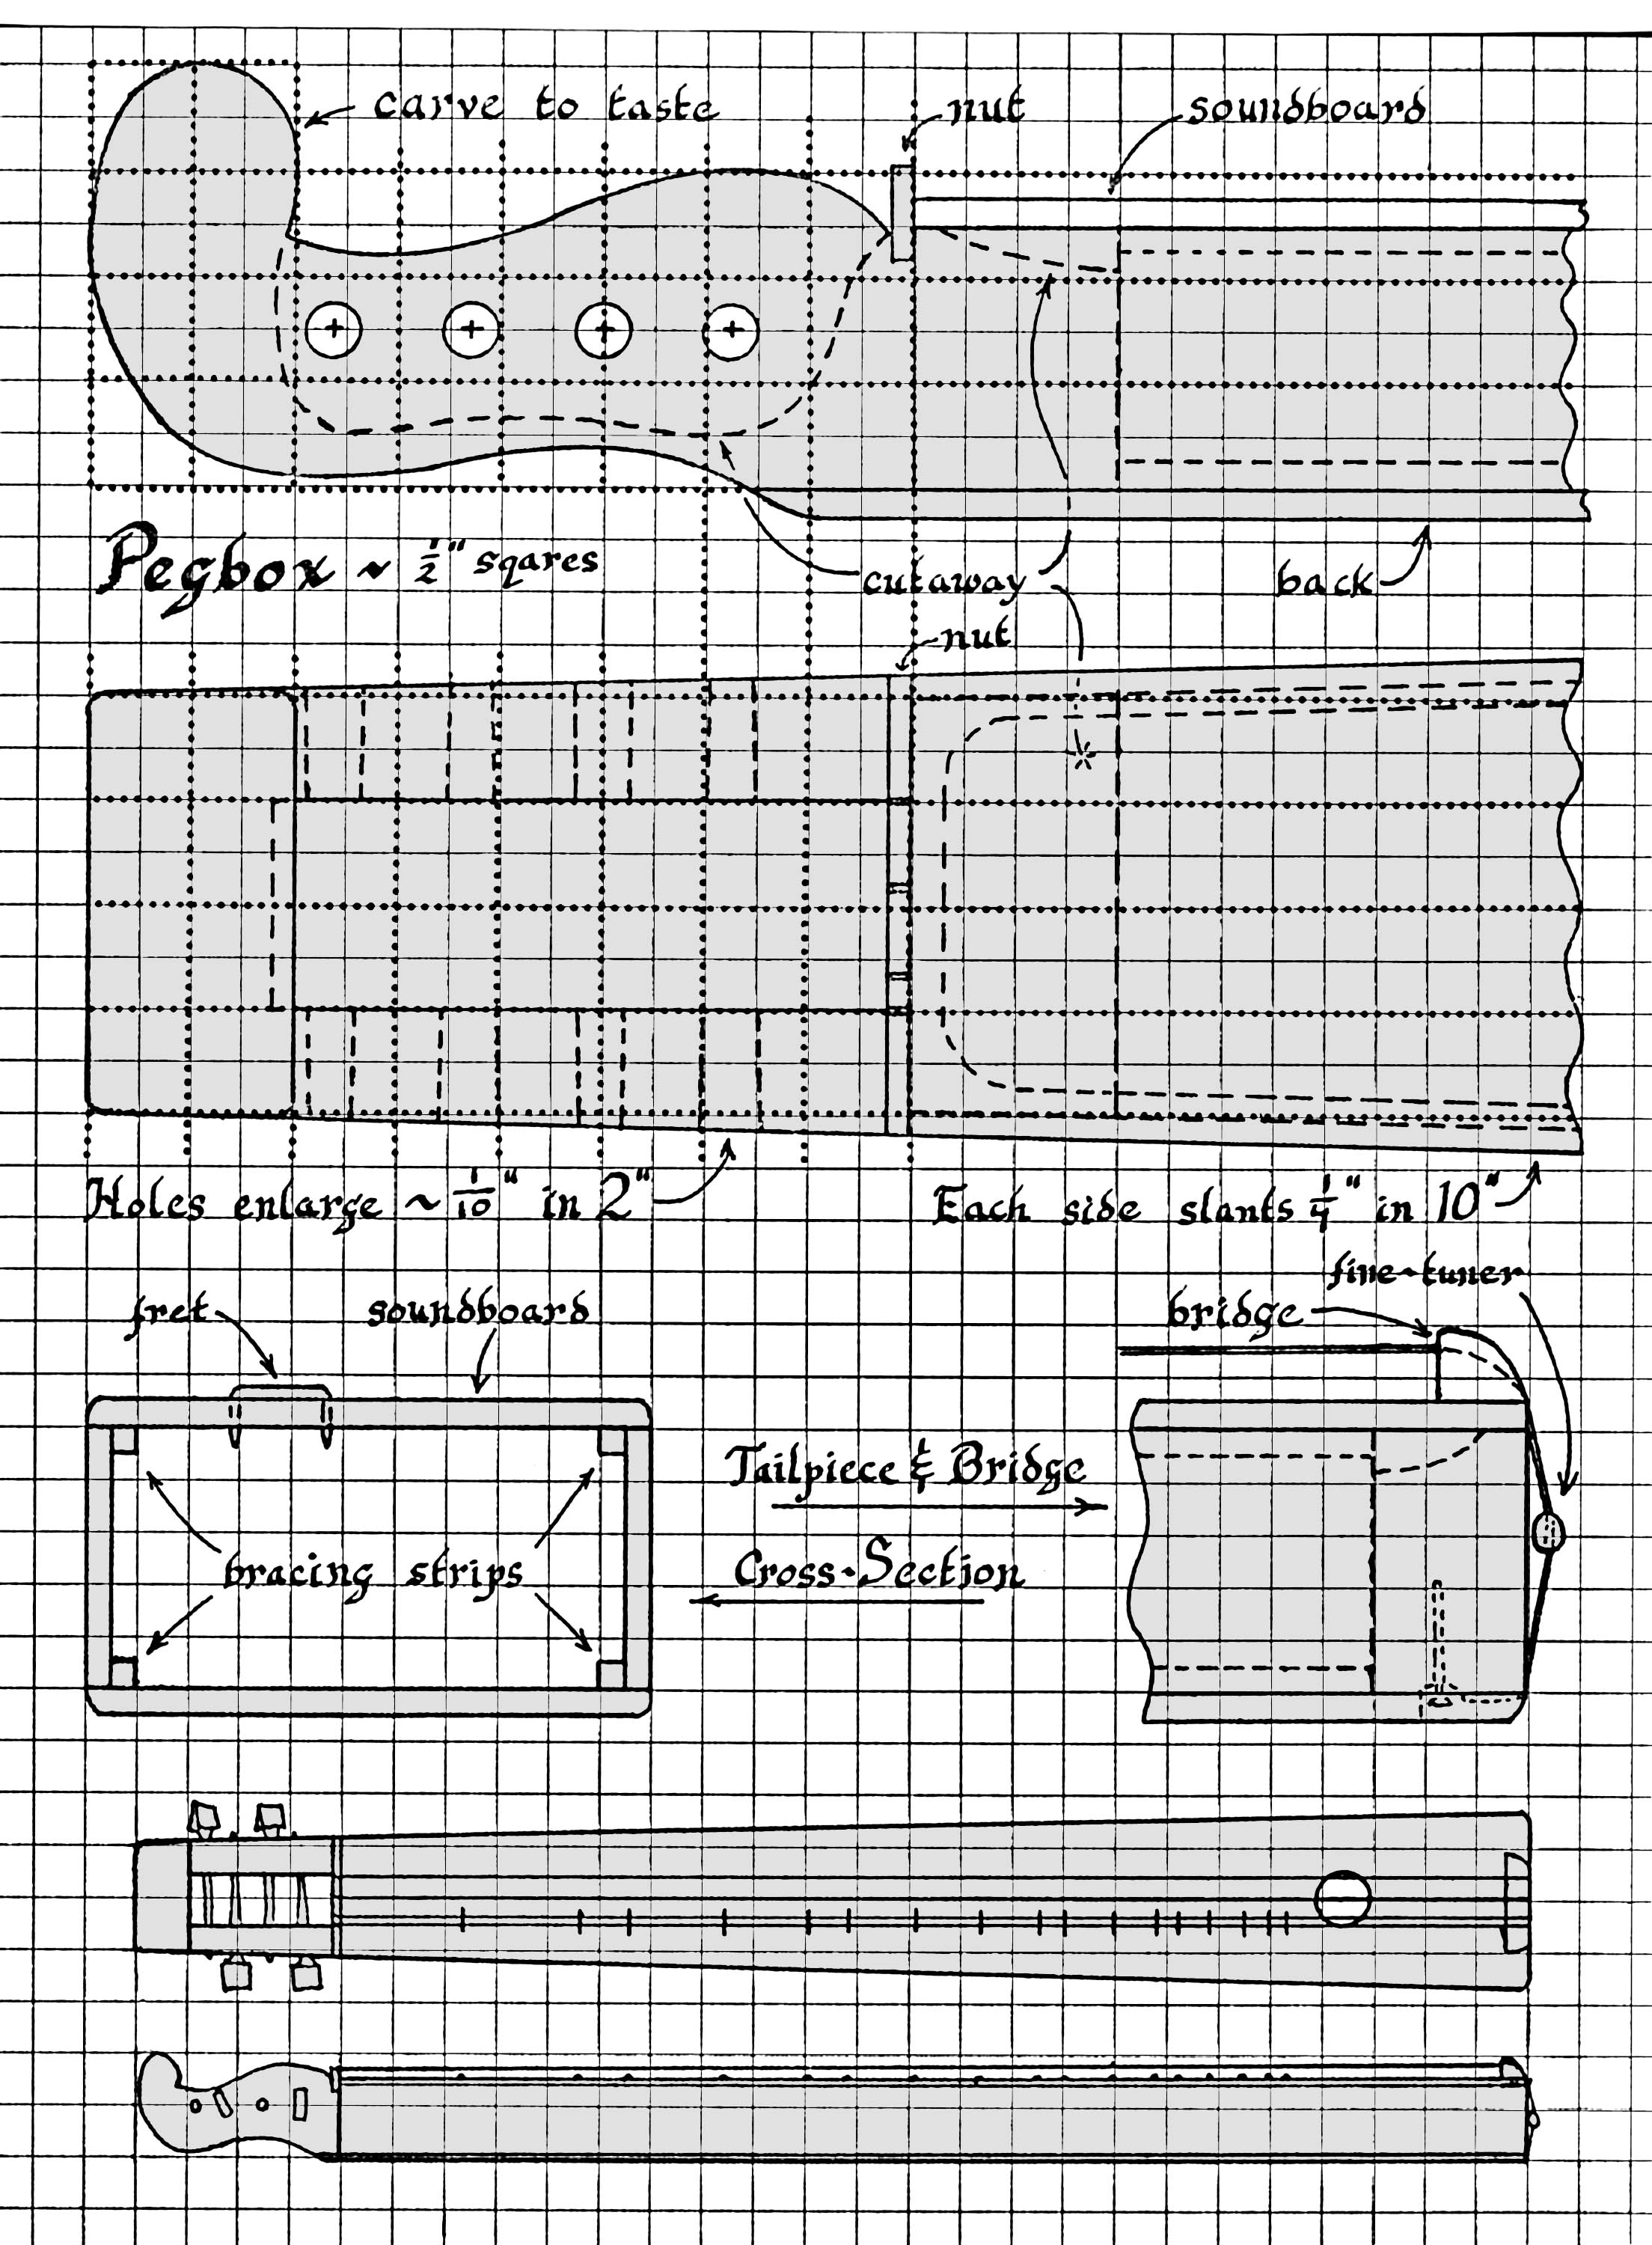
The heart of this instrument is the pegbox: it's made first, then everything else is fit to it. Scale the cross-sectional drawings of the pegbox (fig. 1) onto sturdy paper templates. Glue one of the 2" x 5" x 3/4" pieces of hardwood between the two 1/8" pieces of the same size. After the glue dries, cut out the interior opening; smooth and sand this curved surface. Glue and clamp this between the two remaining pieces of 2" x 5" hardwood. Clean excess glue out of the recess thus formed. After the glue dries, cut to the scroll shape. Don't cut the lengthwise taper yet.
You can use commercial tuning pegs (with a shaft at least 2-1/4" long), or you can make your own. In either case, you'll need a tapered reamer. The place where you buy pegs might have one you can borrow. A machinist's taper-pin reamer would be excellent. A rat-tail file will work. In any case, the taper should be gentle -- the diameter of the one I used increased only 1/8" in 2-1/2". Drill a hole slightly smaller than the narrow end of the peg -probably about 3/16" dia.
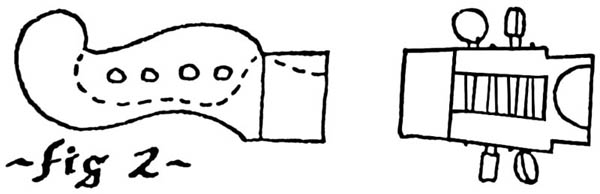
Slant the pegbox sides, about 1/8" in 5". This means the (5") pegbox should be 2" wide at the scrolled end, and 2-1/4" wide at the soundbox end. So the soundbox sides can be mounted flush, cut a mounting wedge in from this line by the thickness of the sides. (See figs. 1 and 2.)
Ream out the pegholes to fit the tuning-peg shafts (purchased pegs) or to about 3/16" at the narrow end (make-your-own pegs). Use the reamer from alternating sides, so the peg-heads will alternate too.
After sanding down the entire assembly, do any decorative carving you feel appropriate.
To make your own pegs, turn them to fit (if you have a lathe) or whittle them. Use the hardest wood available to you: walnut or maple are acceptable, rosewood or ebony even better. Split the wood along its grain to make blanks. Whittle the tapered shaft a bit oversize, and work it around in the tapered hole. The high spots will be shiny. Trim them down slowly until the shiny surface is distributed evenly around and along the peg, and it fits properly. Sand it down, and mark the peg in some way so you can return it to its proper hole -- for they all will be just a hair different, and each peg will fit most comfortably in its own hole. After you have the shafts right, you can carve the heads so they are easy to grip when tuning.
Sides and Back
Lay the pegbox on a rigid and very flat surface (check with a straight-edge) and glue the sides to the pegbox. Make sure there's no twist in the instrument. Cut a tapered wood block, 3" wide, for the tailpiece. Glue in place so the instrument has an overall length of 23" from the nut to the far end of the tailpiece. (See fig. 1.) The sides will extend a bit beyond the tailpiece; trim them even.
Glue four 1/8" square bracing strips to the inside edges of the sides. Spring clothespins make superior clamps for this job. Let the glue dry thoroughly.
Sand the bottom surface completely flat -- this is most easily done by placing a large strip of sandpaper on the flat surface and pushing the entire instrument back-and-forth along it. At the very least use as large a sanding block as you can, wide enough to sand both sides at once. (This protects the edges from getting rounded.) Clean up the flat surface, and lay the back on it, inside up. Run a bead of glue around the perimeter of the body, and set it down on the back; put a series of weights (bricks or books are nice) to weight it down. It's easiest to start with the back oversize, then trim to fit; this allows room for maneuvering. Use lots of glue and heavyweights, and don't worry if a bit of glue squeezes out -- you don't mind on the inside, and you'll sand it off the outside. Let dry, and trim the back to fit.
Frets and Soundboard
There are a number of ways to install frets. You could use round toothpicks, split in two, and glue them in position. You could use an ordinary staple gun to drive heavy-duty staples. (Not recommended for finer instruments.) I used a sort of 'staple' bent out of 1/16" brazing rod. You could even bend the staples out of smooth paperclips.
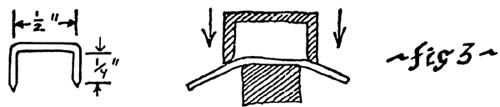
The legs of this staple should be about 1/4" long, and about 1/2" apart. You will need 16 of them; I made a metal jig for bending them, and made about 24 so I would be sure to have enough (fig. 3). Turned out to be a good idea, as they didn't all come out the way they were supposed to. File points on the ends of the legs.
Square off one end of the soundboard (that'll be the nut end) and draw a centerline on the surface you intend to face the inside of the instrument. Make a soundhole about 1 to 1-1/2 inch diameter whose center is on the centerline 19-1/4" from the squared-off end. This soundhole is one of the traditional places to display artistic talent; I fit a circle of hardwood in the hole, drilled in a decorative pattern. You could use a plain hole, or carve the material of the soundboard itself.
Place the soundboard in your lap, inside--up, with the soundhole nearer your dominant hand. (Doing it this way gives lefties a left-handed instrument, righties a right-handed one.) Put a typical fret staple at each end of the soundboard, centered 7/l6" beyond the centerline, and mark the points of the staple. Draw two straight lines between these corresponding points.
You now choose either the modern equal-tempered diatonic scale, or the archaic just scale that gives exact intervals. I used the modern scale; Chet Hines (How to Make and Play the Dulcimore) used the just scale and reports that it sounds strange to modern ears, but has a certain beauty of its own. Mark out the fret positions per the Table, using the nut end of the soundboard as a reference. Drill holes for the staple legs -- just a hair smaller than the wire the fret staples are made from -- wherever the fret-distance and fret-width lines meet.
Sand the inside of the soundboard reasonably well (getting down to a medium or fine grade of. sandpaper) and then sand the outside extremely well, going down to extra-fine. (You are sanding the outside now because it will be much more difficult once the frets are installed.)
Find a firm support for the soundboard which will nevertheless allow the legs of the fret staples to come out underneath. (Setting the soundboard, inside down, on a firm sheet of Styrofoam insulating board is ideal.) Tap the frets gently in place with a plastic or rubber hammer. If you only have a steel hammer, put a piece of softwood on top of the fret first.
Mounting the Soundboard
Carve hollows in the end blocks of the instrument so the soundboard will be supported by only about 1/4" of wood all around its perimeter. They need only be deep enough to give the soundboard freedom to vibrate at its ends. Sand the top edges of the body smooth and flat. Put the scheitholt on the flat surface, bottom down, and squeeze a bead of glue along its upper perimeter. Put the nut in place and lay the soundboard down on the body, snugging it up against the nut and making sure the centerline is centered.
You'll want to weight the soundboard down, but the frets rise above its surface and cause difficulties. Lay thin strips of wood on top, right above the glue line; then put bricks or books resting on those strips. After the glue has dried half an hour, scrape the drips off and trim the overhanging edges of the soundboard to fit the body. Round off the edges, both on soundboard and back.
Take a long metal-file and slide it along the length of the fret pattern; this will even off any frets that are too high. Go over the frets with extra-fine sandpaper held with the fingers, to smooth out the file cuts. Clean up the wood surface with 00 steel wool.
Final Details
The bridge is made from hardwood, about 1-1/2" x 1/2" x 3/8" with the grain running the length of the piece. Referring to Fig. 1, round off the ends. Glue to the soundboard with the inboard edge exactly 22-1/2" from the nut end of the soundboard. (The exact distance is important for the tuning.) Trim the outer edge even with the end of the soundboard. Smooth off, and round over as per fig. l; we don't want any sharp corners, as the strings will wrap around this curve.
Banjo strings -- the type we will use -- have a small loop at one end. Recess a small nail in the bottom of the tailpiece for this loop, and carve a slot for the string to go through, rounded where it meets the tailpiece. (Brass escutcheon pins look especially nice.) With everything recessed, the strings cannot catch fabric where they are fastened. Because the scheitholt is played in your lap, this could otherwise be a problem.
Trim your nut material (which can be bone, hard plastic, or long grain hardwood) to fit the nut slot between the squared end of the soundboard and the pegbox. Install the nut temporarily, and mark it at the extreme width of the pegbox opening (about 1") for the outer strings. Make another mark 1/8" away from the mark nearest your body -- i.e., on the side with the frets. Center a fourth mark between the others. Transfer these marks to the bridge. Cut slots in the nut and bridge for the strings, as in figs. 1 and 4.
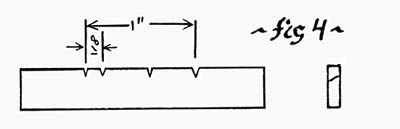
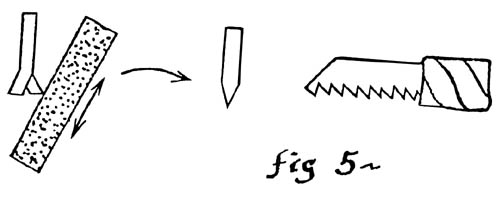
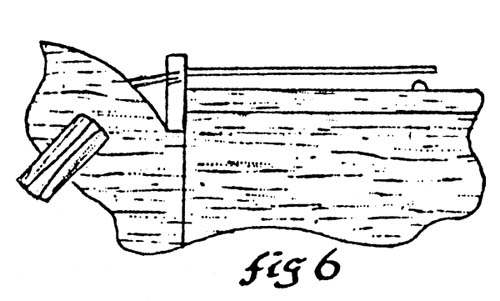
To keep the strings from buzzing, the slots must have very sharp bottoms, which slope away from the body of the instrument. The main cut is easily made with a wedge-shaped Swiss file; the sharp bottom is made by taking a piece of bandsaw or hacksaw blade and sharpening the teeth to a point with a sharpening stone (fig. 5). The strings should come out about 1/16" (the fret thickness) above the sound board at the nut. (Fig. 6) You will probably want to start the bridge slots out too high, then cut them deeper during final adjustments.
Finishing
The scheitholt is now almost ready for its finish. Round all the corners with medium or fine sandpaper. This prevents splinters forming, makes the wood less vulnerable to bumps, etc. Fine-sand down all the wood surfaces one final time. (Skip the soundboard if you can, to avoid sanding the frets and getting metal particles in the wood.)
Bend a coat hanger so you can hang the instrument in the air by the peg-holes, so no exterior portion of the instrument is touching anything. Spread newspaper beneath.
Rub down the entire instrument with a soft cloth wet with boiled linseed oil or other drying oil. An hour later, use a soft cloth to clean off as much of the oil as you can. Wait 24 hours. Rub down with 00 steel wool; clean with soft cloth. Rub down with oil again; wait an hour; wipe off; wait 24 hours; rub down with steel wool. Coat the instrument with a good paste wax, wait an hour, and polish. Let stand overnight, and wax once more. (Do the same with the tuning pegs.) Clean out the tuning peg holes with cloth and steel wool.
This finish gives a much mellower sound than varnish or shellac. With a small instrument such as this, you will need all the mellowness you can get. When necessary, clean with a damp cloth, let dry, and apply another coat of paste wax.
Adjusting the Action; Tuning
Insert the tuning pegs in their proper. holes, as you have marked them. Check the top view of the complete instrument in fig. 1 to see which strings go to each peg. Mark the location where the string attaches; drill a 1/16" hole there in each peg. Install the strings, with the wrapped string in the slot farthest from your body.
Tune the melody strings (those passing over the frets) to B an octave below the B on a guitar tuning pipe. Play up and down the scales; ideally, all notes should be sharp and clear, with no great effort to push the strings down and no "buzzing" caused by the strings touching inappropriate frets during their vibrations.
With shallow slots in the bridge, you will probably have to press down on the strings exceedingly hard. Adjust the action by gradually deepening the slots in the bridge until it is easy to fret your notes, but the string is still high enough not to buzz against the neighboring fret. (You don't have to remove the string to deepen the slot -- just loosen it enough that it can be slipped out.) Cut all slots in the bridge to this height, then touch up the raw wood surfaces with a Q-tip dipped in boiled linseed oil.
When you have found a satisfactory action, tune the fretted (melody) strings until you find the key your scheitholt sounds happiest in. Tune the three unwrapped strings in unison; tune the wrapped string a fifth down. (Press the melody strings at the third fret; the wrapped string should be an octave down from that.) The two strings closest to you form a double string, on which the melody is played; the remaining two strings will give a drone effect much like the bagpipe:
For details of playing, see a book such as Jean Ritchie's The Dulcimer Book. The scheitholt is most easily played by ear, or from the old shape-note notation. It only plays in one key at a time, though it is capable of all the classical modes of music. The tuning I give is for the Ionian mode, which evolved into the modern major keys.
Another useful tuning is the Dorian mode, wherein you leave the two drone strings alone and lower the melody strings two semitones (so that the melody strings, stopped at the first fret, will sound the same note as the unwrapped drone). This is a minor mode, used for a lot of early songs.
The scheitholt is a self-sufficient, quiet little instrument – nothing to take to parties, but excellent for meditation. It can be tuned like a bagpipe, and most pipe music sounds good on it – yet it sounds nothing like a bagpipe. Its sound is most like that of the Appalachian dulcimer, but gentler and less resonant. It has an aura of simpler, quieter days about it, with its sound as uncomplicated as its body. It's an excellent first instrument, both for woodworkers and for musicians.
* * * * *
I must apologize a bit for the illustrations in this article; I originally did them in 1977, and they've gone through a couple generations of Xerox and Photoshopping to get to the twenty-first century. (And Xerox in 1977 was nowhere near the fidelity it's achieved today!) We do the best we can. And since the best doesn't always display well on a monitor, I've included a scan of Fig. 1 to much higher resolution so you can print it out and get something useable.