Making Inexpensive Jewelers' Tools
Elli Lutemaker
As artisans grow, they learn the abilities – and limitations - of their tools. They begin to want more tools. At first this is easy: common tools for common jobs are commonly available at a price the common artisan can pay. More screwdrivers! More chisels! Bigger hammers, and smaller!
But as we progress, the jobs get trickier. We want a punch shaped just so to texture a background. Nobody else has wanted that precise shape; nobody has manufactured it, stocked it in a store. After we've used it, we may never need it again.
We'll have to make it ourselves. If we only want it for a short while, make it cheap and easy. One of the most valuable skills an artisan can have is toolmaking; one of the most valuable resources, a supply of hard, tough steel to make them from.
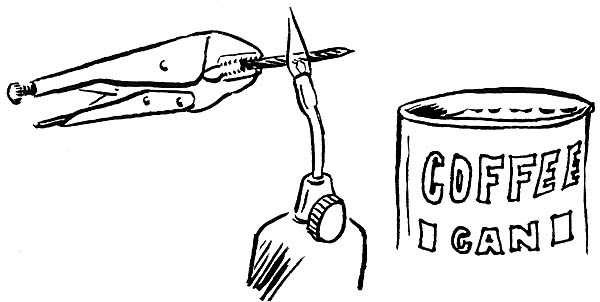
My favorite stock for small tools is the common masonry nail. They are incredibly tough – being hammered into concrete is not for weaklings. They are available in a range of sizes and shapes, and cost only pennies each.
They can be cold-ground, or hot-worked with only a propane torch, to do a wide range of things. For convenience, I will assume access to the same tools as I have: a strip sander, a grinder/buffer, a vise with anvil flat; propane torch, hammer, vise-grips. A set of jewelers' files is valuable for detail work.
Since these nails are very hard steel, a normal hardened hammer can slip off. Strike them with a soft hammer - a rawhide mallet, a plastic-faced hammer, or even a brass hammer.
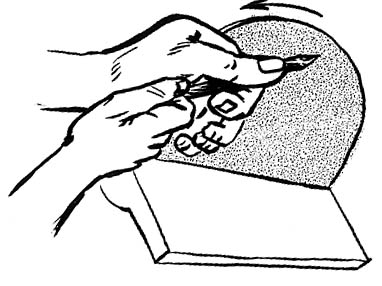
Center punches, prick punches, and scribers are easiest to make from a round masonry nail. Just spin the tip of your nail against the grinding wheel at the proper angle until you have a fine conical point. Guide with one hand, spin with the other; be careful not to overheat the nail and draw its hardness. Centerpunches are migratory in my (shared) shop. Fifteen seconds work on a masonry nail gives me the punch I want, and is easier than finding one gone the least bit astray.
Chasing and embossing tools are used, from both front and back, to shape and model the surface of thin metal. They have rounded, polished tips in a variety of shapes and sizes: circle, oval, triangle, square, line.
Most of these may be ground with the same hand technique as punches. Since we're removing more metal, the grindstone will generate more heat; dip the tool in cool water frequently. Always wear eye protection while doing this - but it's good discipline to use bare hands. That way we know when the metal is getting too hot.
After we've ground the tool to the desired shape, neaten it up on the strip sander and give it a mirror polish on the buffing wheel, with an aggressive polishing compound for metal this hard. Make each shape in a range of sizes.
When we make tracers, we move over to hot working. A tracer is like a chisel with edge and corners rounded instead of sharp; they're used to pound lines into metal sheets, and thus are themselves linear. We can't get much of a line from grinding down the cross-section of a nail.
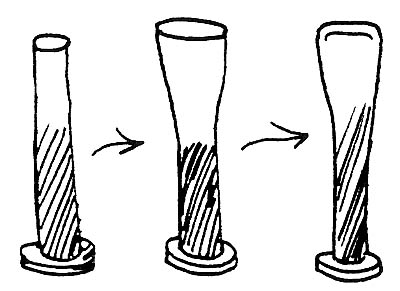
Set a masonry nail on something that can take heat, like firebrick. Heat it red with a propane torch and let it cool slowly, to take the hardness out of the metal. Cut off the point with a hacksaw, and grind the flutes off the shank near the tip.
Clamp the vise-grip tightly near the head of the nail, heat the tip red, and use the hammer and anvil to beat it flatter and wider. Re-heat as necessary. Use files, grinder, and strip-sander to shape it, and polish the working end on the buffer.
Hardening and Tempering
To harden the nail up again, take a metal can full of cold water. (Otherwise, we could end up with a wet floor. Hot metal can melt a plastic bucket before it cools.) Heat the nail red-hot, then plunge it into the water. Polish to a bright surface.
The tool is now very hard, but brittle. To temper the steel, draw a bit of the brittleness out by controlled heating and cooling. Grab the far end of the nail in the vise-grips, and heat the shaft of the tool with the propane torch. As the steel heats, the bright surface will change colors - first pale yellow, then darker yellow, shades of purple, and dark blue, fading to light blue. These colors are the result of oxidization, and tell us the temperature of the steel surface. As the shaft heats, the colors will spread down its length to the tip. When the working tip of the tool is the color of straw, plunge the tool into cold water again.
Graining tools are similar to chasing tools, but with a recessed end; hammering them into sheet metal creates a forced-down perimeter surrounding a domed area. You can also use them to put a shaped head on a small rivet.
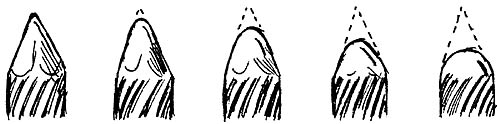
Let's start with a circle grainer. Grind a flat surface on the tip of a masonry nail, then clamp the nail upright in a vise. Heat the tip of the nail red-hot, then hammer a centerpunch into the center of the flat surface until you have a hole of the desired diameter. The centerpunch here is used as a counter-punch, a metal object the mirror image of the hole we end up with.
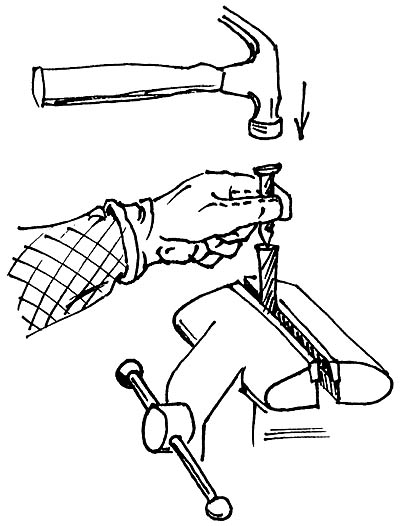
This is not a foolproof operation. We're dealing with red-hot metal, so wear leather work gloves Just In Case. We have to work fast before the metal cools, so we may miss our mark. If we hit the punch too hard, or at an angle, we may bend the hot nail. Hammering a punch into heated metal may soften it. Dozens of things can go wrong.
Isn't it good to experiment with affordable materials? Get another nail, and keep on going. Touch up the punch and re-harden it. Grab that bent nail with the vise-grips (after it cools enough to handle). Heat it up again, and straighten it on the anvil. If the mark is off-center, grind down the tip of the nail and try again. If worse comes to worst, toss it. (Don't toss a hot nail in a wastebasket full of flammables!) Practice improves the batting average wonderfully.
When we have a satisfactory recess in the center of a straight-shafted nail, clean up the details. Flatten the tip of the nail so it meets the grinder or strip-sander at right angles. Now, using the same grip as for grinding our chasing tools, grind symmetrical shoulders around that recess - sharpened or rounded, depending on the effect we want. Polish and harden.
This requires exacting hand/eye coordination. Wear eye protection – we're cozying right up to the grinder. And practice holding the nail so we can see the recess we're working on.
A centerpunch makes a conical hole. Other shapes of graining tool require other shapes of counter-punch. Make a pyramidal tip on a counter-punch to get square grains instead of round ones. Rivet-doming tools work better when the recess is formed with a rounded counter-punch; and we may even want to grind (say) a five-petaled counter-punch to make the tool to create rivets with a rose-petal head.
(Rivet-headers sometimes need to be larger than you can make from a masonry nail. Get a pin-punch or similar tool, and rework using the same techniques suggested here. Make sure it isn't cadmium-plated - breathing hot cadmium fumes is bad for the health.)
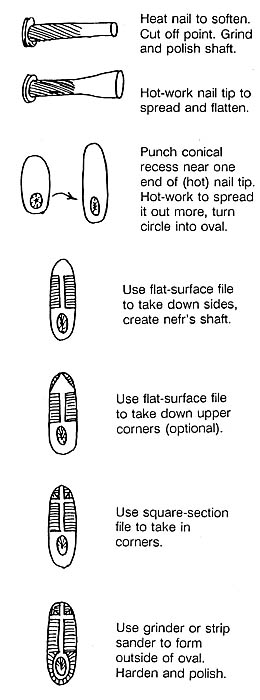
A final, extreme example of what can be done with masonry nails: makers' marks. I needed a stamp for silverwork. My mark is the Egyptian hieroglyph nefr: a cross upon an oval. I started by preparing an elongated blank, as if I were making a tracer. I punched a conical hole into one end, then hot-worked the end thinner and taller; this converted the circle into an oval.
The heating had softened the steel enough that a jeweler's file would bite; I filed a cross in the end, with its upright reaching down to the oval. Then I filed down the outside of the tool around the oval. I tested the stamp on soft copper as I worked, and when I was satisfied I heated and quenched it, then drew the temper down to a straw color. A polished shaft is slippery; so somewhere in here, grind the shaft with a coarse stone to give a better grip.