To Line or Not To Line
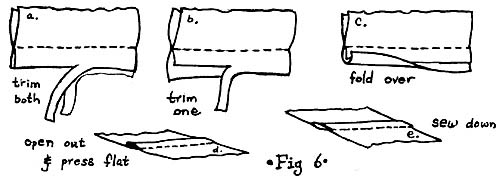
Now for a slight digression. Do you want your cloak lined, or not? For indoor dress wear, an unlined cloak is preferable: it is cooler and lighter. But the seams are visible. Well, then, use a flat felled seam, which looks perfectly good from either side of the cloth. To make a flat felled seam (fig. 6) first stitch the two pieces of fabric together along the seamline, good sides together. Trim seam allowance to about 1/2", then trim one seam allowance to half that. Fold the larger seam allowance over the smaller, and press flat; then top-stitch. It is easiest to assemble all of the kites separately, then stitch them together afterwards. Don't even try to get all the seams to reach all the way to the apex of the cloak; just have all the kite points meet there.
If you intend to line the cloak you don't need flat felled seams. They're stronger, but ordinary seams are less obtrusive; suit yourself. Make the lining exactly the way you made the cloak itself. The two kinds of cloth may not be the same size, in which case you will get two different fractions of a circle. Make the larger fraction of the cheaper cloth.
Because of the way the kites are assembled, the edges of your cloak are selvages, and you don't have to finish them. That leaves the neck-hole and the hem - and it is easiest to do the hem last. First, we must finish the neck opening.
Linings, Facings, Collars, and Capelets
For a lined cloak with no collar, simply place the cloak and lining together, good sides facing, and stitch around the circle of the neck opening. Trim the cloth, leaving about 3/8" seam allowance.
Now, this next step is vital. Cloak and lining are not made of the same material, and will not sag in the same way when subjected to gravity. If you just sew them together, turn inside out, and top stitch -why, the one will sag more than the other and your cloak will get all baggy. That's ugly. Pin the neck opening closed (just like you would when wearing the cloak) and put it on a hangar, and leave it alone for a couple of days so it can do all the sagging it wants. The best kind of hanger is one of those expensive wooden ones that does a very good imitation of shoulders.
After you've sagged the material, lay it on the floor and (still right sides together) pin up the cloak opening. Put on the cloak, stand up, and have a helper mark out the hem for you . Mark the hem of the lining about an inch higher than the hem of the outer cloak. Hem the bottom in whatever manner you customarily use, with the turnunder going to the wrong side of both cloak and lining. Then stitch up the edges of the front opening. Clip the curved neck-opening seam allowance. Turn, press, and top-stitch.

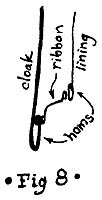
The hem of the cloak and the hem of the lining still are not attached. Well frankly, they shouldn't be fastened tightly together - because even if we pre-sag the cloth, the cloak and its lining will age differently. What we want to do is have them working in coordination. Do not sew cloak and lining together directly; instead, fasten them together with ribbons every couple feet, so they have two inches or so of independent motion. (fig. 8).
If you chose to make an unlined cloak, the job of finishing it off is easier. There are three ways to go: a facing, a collar, or a shoulder capelet.
To face your neck-hole, simply take two circles of cloth about a foot in diameter. Sew them around the outside; trim seam allowance to 3 / 8" and cut notches (fig. 9). Cut a small hole in the center of one of the pieces, turn the circle inside-out, and top-stitch the edge. Pin the facing down to the good side of the cloak, centered on the neck-hole. Sew from the outside of the circle along one front seam, around the neck-hole, and down the other front seam. Trim seam allowance to 3/ 8", clip seam allowance of neck-hole, turn, and top-stitch. Hem as before.
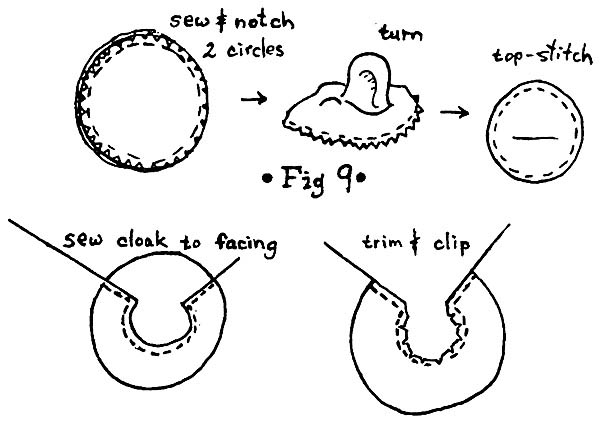
To make a collar, trace the outline of the laid-flat cloak onto a large sheet of paper. Cut the neck opening and front opening to size (no seam allowance). Put it around your neck, then draw the collar outline you want on the paper, trim, and try it on to make sure you like it. Trace this onto your collar and collar lining material (I used a fake fur for the collar and heavy taffeta for the lining) and include a seam allowance. Pin collar and collar lining good sides together, then sew around the lower and front edges of the material (fig. 10). Overstitch or not, as appropriate.
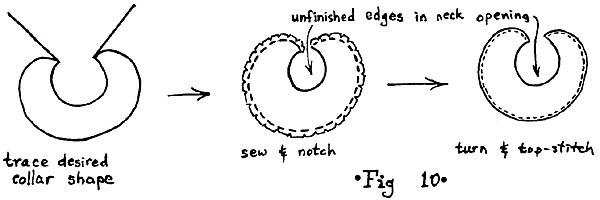
If you want an embroidered collar, it is best to do the embroidery before sewing to the lining. Pin the good side of the collar to the inside of the cloak; sew the neck openings together. Trim to scant seam allowance, clip, turn, and overstitch. When I made my fake-fur collar, I had to do the overstitching by hand. I went in along the path of the fibers, so the stitching cannot be detected from the fur side.
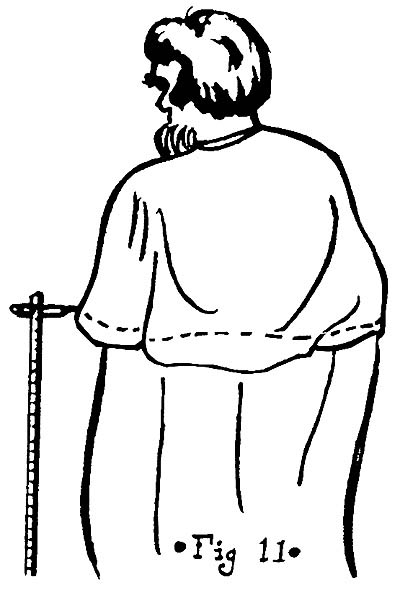
To make a shoulder capelet, simply make a small cloak to fit around the neck and to hang a bit below the shoulders. You will probably want to make this one out of a single piece of cloth - it's small enough. These look better when they are full, so make the capelet a full circle. Obviously, the capelet cannot be fit up perfectly if the cloak below is not a full circle; but that turns out to be irrelevant. Simply make sure the circumference of the two neck openings are identical, and proceed as with the collar. You then will have a cloak and capelet, neither hemmed at the bottom edge. Put them on, and have a helper mark out the hems. It is better to mark the hems out last, especially with the capelet, because the width of your shoulders will make the final cloak not-quite-a-circle. Why try to calculate when you can see what you want? (Fig. 11)