The Circle Game
It is possible, with a bit of cutting, shifting, and sewing, to take cloth of most any width and turn it into a cloak of any desired length and fraction of a circle. Furthermore, there is very little wasted fabric (especially for the narrower widths). It's all done with triangles and plane geometry.
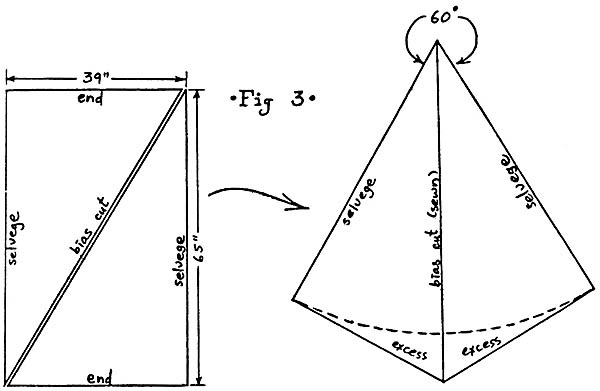
For clarity of illustration, let's settle on a specific width of material-and length of cloak: say the material is 39" wide (which is about the narrowest you will meet) and we want the cloak to be a 65" radius circle. To determine how much fabric we'll need, let us work in 1/8-scale on paper. Lay out a rectangle 39/8" by 65/8" (that is, 4 7/8 x 8 1/8") and draw a diagonal as per fig. 3. Cut the paper on the diagonal, flip one of the nieces over, and tape their long sides together. This will give you a small kite-shaped piece of paper. Now take another sheet of paper, and with the pointiest end of the kite in the center, trace the outline of the kite. (Don't worry if you can't get it all on the sheet-you're mainly interested in the pointy part.) Rotate the kite around the center, and draw another beside the first. Do this until you have as much of a circle as you want. Count the kites you used, and multiply by about 68" (add a few inches to the 65" to give some room for error). You will need this length of fabric.
If you have a protractor, you can measure the angle and calculate without the second drawing. This example gives a 60 degree angle, which is pure coincidence (you are just as likely to meet 71.3 degrees) but very convenient for illustration.
Figure 4 shows a set of these kites put together. Six of them would give a full circle, or three a half-circle; four or five would give a nice effect and economize a bit on fabric over the full circle. Five times 68" is about 9 1/2 yards (10.3 square yards) for a very full cloak from very narrow material. To contrast, you'd need 6 2/ 3 yards of 60" material (11.1 square yards) for a full-circle cloak, using the method of fig. 2; and it would be shorter.

Which is all very well, but now we get to fig. 5; an intimidating pattern if ever I saw one. Why is it that complicated? Because, cloth can be complicated. Remember when we first cut the paper on the diagonal I said "flip one of the pieces over". That is fine if the cloth looks the same on both sides - and often enough it does. In that case, work with fig. 3 and forget about fig. 5.
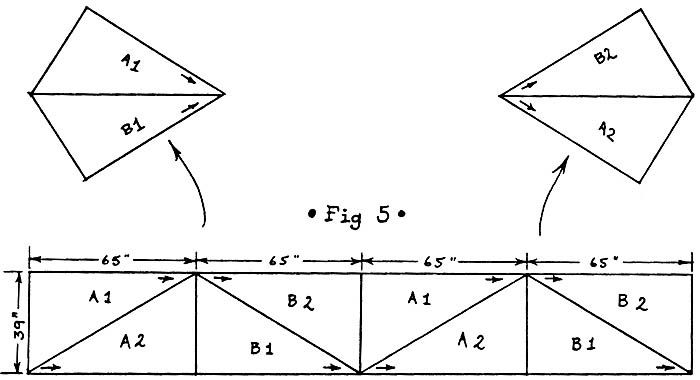
Flannel-back satin doesn't flip over gracefully. But if you zigzag the cut as in fig. 5, you don't have to flip anything over - just join up an "A" and a "B". When this happens, you must go to an even number of kites in your cloak; in this case we would get either a full circle (six kites) or a two-thirds-circle (four kites). Nothing wrong with the latter - it isn't mentioned often in theoretical discussions, but in The Evolution of Fashion, Hill & Bucknell have it for 1150 and 1190.
The fun really starts when you have napped fabrics, or a directional pattern. Often, you cannot reverse directions with napped fabrics (they catch the light differently when the nap is up or down). You have two choices: make the difference a part of the design, or double up the material and make two cloaks, one with nap up and the other with nap down. If the nap points up, don't wear that one in the rain, though... The kite A1-B1 has the nap or pattern running opposite to the kite A2-B2.
Napped fabrics, or directional fabrics, are not well suited to this pattern. Probably the most efficient way to use a napped fabric would be to go particolour, because the difference in naps would not show if there were contrasting fabric between. Be sure the materials are the same type and weight, though! As for directional fabrics – forget them unless you have a use for the other half of the material. NOTE: You can also use the different naps as linings, as might be especially useful with fake furs. Have the fur fibers pointed down (to shed rain) on the outside; then you can use the up-pointed segments as fur linings.